

Picture this: you’ve bought beautiful tiles for your bathroom, laid out half the floor, and then a wonky, cracked edge throws off the whole look. Nothing derails a tiling project faster than sloppy cuts. The good news is that learning how to use tile cutter tools properly is far easier than it seems, and it makes a huge difference in the finished result.

In this guide, you’ll learn how to use a tile cutter and snap ceramic tile with a manual cutter, when to reach for a wet saw instead, and how to get clean, straight edges every time. We’ll cover the gear you need, a clear step-by-step walkthrough, and pro tips that separate rough beginner work from crisp, professional-looking results. By the end, you’ll be cutting tile with confidence.
What You’ll Need
Gather everything before you start. A tidy setup means fewer interruptions once you’re in the zone.
- A manual snap cutter (or a wet saw for tougher jobs)
- The tiles you plan to cut (ceramic tile or porcelain tile)
- A pencil or washable marker for your cutting line
- A tape measure and a straightedge or square
- Tile nippers for curves and small notches
- Safety glasses to protect your eyes from chips
- Work gloves for handling sharp edges
- A flat, stable workbench or table
- Tile spacers to help plan your layout
- A rag and some water to keep things clean
- Fine sandpaper or a rubbing stone to smooth cut edges
Match the tool to the tile. A manual cutter handles most standard ceramic tile beautifully, while a wet saw earns its keep on thick porcelain tile, natural stone, or detailed cuts.
Step-by-Step Guide on How to Use Tile Cutter Tools
Follow these steps in order. Clean cuts come down to accurate marking, a confident single score, and a firm, even snap. Rush the measuring, and every tile after it looks off. Take your time, and you’ll be amazed at how professional your work looks.
Step 1: Measure and Plan Your Tile Layout
Start by dry-laying your tiles across the floor or wall before you cut anything. This tile layout step shows you where the cut tiles will land and helps you avoid thin, awkward slivers at the edges. Use tile spacers between each piece to mimic the real grout lines you’ll fill later. Shuffle the tiles around until the pattern looks balanced and centered.
Measure the gap you need to fill, then subtract room for the spacers. Write your measurement down so you don’t second-guess it at the cutter. Planning first saves you from wasting tiles on guesswork. A few minutes here pays off across the whole project.
Step 2: Mark a Clear Cutting Line
Transfer your measurement onto the tile with a pencil or washable marker. Line up a square or straightedge and draw a crisp cutting line straight across the surface. Double-check the mark against your measurement before you commit, since a slip of even a couple millimeters can leave a visible gap. Accuracy here is the difference between a snug fit and a frustrating redo.
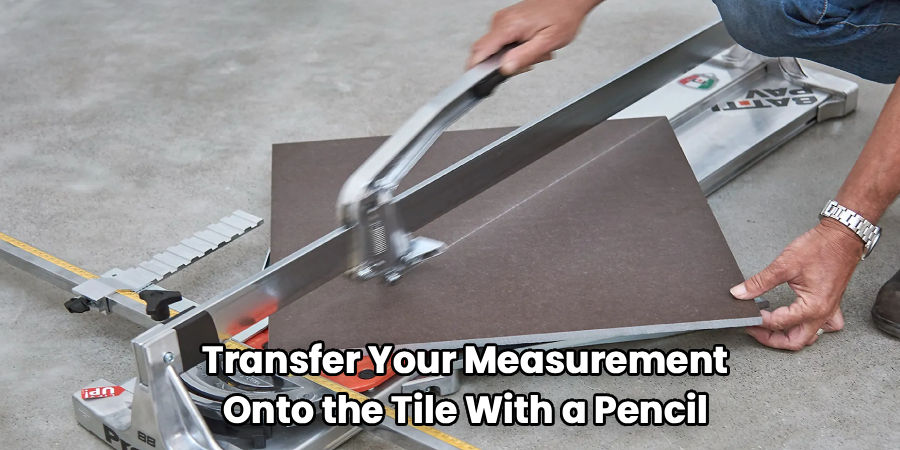
For repeat cuts of the same size, use the cutter’s built-in guide or a stop block. That way every tile matches without re-measuring each one. Keep your line dark enough to see clearly but light enough to wipe away. Mark twice, cut once.
Step 3: Set Up and Inspect Your Cutter
Place your snap cutter on a flat, stable surface where it won’t rock or slide. Check that the scoring wheel spins freely and looks sharp, since a worn wheel drags and gives you a ragged score. Wipe any dust or grit off the rails so the carriage glides smoothly. If the wheel is chipped or dull, swap it out before you begin.
Get familiar with the parts. The scoring wheel scratches the surface, and the padded feet or “wings” press down to snap the tile. Slide the carriage back and forth a few times to feel the motion. A quick check now means no nasty surprises mid-cut.
Step 4: Position the Tile Squarely
Lay the tile flat on the cutter’s base and slide it under the scoring wheel. Line your marked cutting line up perfectly with the wheel’s path, using the guide rails to keep the tile square. Push the tile firmly against the front fence so it can’t shift while you score. Even a tiny angle here will send your cut off course.
Hold the tile steady with your free hand, keeping fingers well clear of the wheel. If your cutter has an adjustable measurement guide, set it now for consistent repeat cuts. Take a second to confirm everything lines up before you press down. A square start guarantees a straight finish.
Step 5: Score the Tile in One Smooth Pass
Here’s where the magic happens. Lower the scoring wheel onto the tile at the near edge, press down with steady pressure, and push the handle away from you in one continuous motion. You want a single, confident pass, not several scratchy back-and-forth strokes. Going over the line twice actually weakens your snap and leaves a jagged edge.
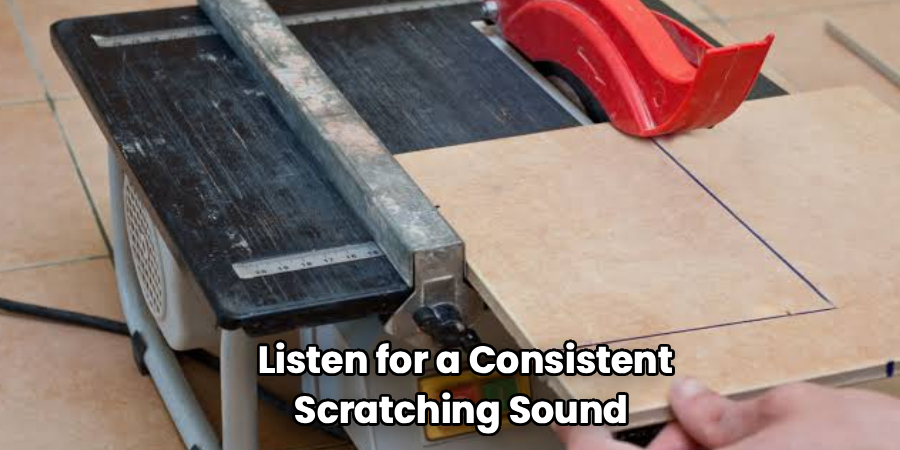
Listen for a consistent scratching sound as the wheel scores the glaze. Keep the pressure even from start to finish so the whole line is scored equally. Don’t press so hard you crack the tile early. One smooth glide across the surface sets up a clean break.
Step 6: Snap the Tile Cleanly
With your line scored, position the cutter’s breaking wings over the tile. Press down firmly and evenly with the handle, and the tile should snap right along the scored cutting line. The break is often quick and satisfying when you’ve scored well. Keep your fingers clear and wear those safety glasses in case a small chip flies off.
If the tile resists, don’t force it sideways or you’ll get a ragged edge. Instead, check that your score was deep and even, then apply steady downward pressure again. A clean score and a confident snap work together. Rushing the snap is the most common mistake beginners make.
Step 7: Shape Curves and Notches With Nippers
Not every cut is a straight line. When you need to fit tile around a pipe, corner, or outlet, reach for your tile nippers. Score the curved outline first with your cutter’s wheel or a scoring tool, then use the nippers to nibble away small bites of tile up to the line. Work slowly, taking little pieces rather than big chunks.
Patience is everything here. Bite off too much at once and you’ll crack the tile past your line. For circular holes in the middle of a tile, a wet saw or hole bit works better than nippers. Small, steady nibbles give you the neat, custom shapes that make a job look pro.
Step 8: Smooth the Cut Edges
Freshly cut tile often has a slightly sharp or rough edge. Run fine sandpaper, a rubbing stone, or a sanding pad along the cut to knock down any burrs. This makes the tile safer to handle and helps it sit flush against its neighbors. Smoothing also improves how your grout lines look once everything is set.
Go easy so you don’t chip the glaze. A few light passes are usually all you need. Wipe the dust away and dry-fit the tile in its spot to check the fit. This small finishing touch separates a rushed job from a polished one.
Step 9: Dry-Fit Before You Set the Tile
Before you spread any adhesive, place your cut tile into position to confirm it fits. Check the gap for spacers and make sure the cut edge lines up with the surrounding grout lines. If it’s slightly too big, a quick pass with the nippers or sandpaper trims it down. Catching a poor fit now saves you from prying up a set tile later.
Once you’re happy, you’re ready to spread adhesive with a notched trowel and press the tile home. Keep your cut edges facing the wall or corner where they’ll be least visible. A careful dry-fit is your last checkpoint. It’s the habit that keeps whole projects looking seamless.
Tips for Best Results
Want your cuts to look like a seasoned tiler did them? These pointers go beyond the basics.
- Keep the scoring wheel sharp and clean. A dull wheel is behind most jagged snaps. Swap it out at the first sign of drag, and add a drop of light oil to the rails so the carriage glides smoothly.
- Score once, never twice. Multiple passes fight against a clean break. One firm, continuous pass creates the perfect stress line for the tile to snap along.
- Save your offcuts. Those leftover pieces are gold for practicing tricky cuts and for filling small edge gaps later. Test a new technique on a scrap before risking a full tile.
- Reach for a wet saw on porcelain. Dense porcelain tile and natural stone are tough on a manual cutter. A tile saw with a water-cooled blade gives cleaner results with far less cracking.
- Cut a little proud, then sand to fit. When in doubt, leave the tiny bit extra and sand down to your cutting line. You can always remove more, but you can’t add it back.
Frequently Asked Questions
What Is the Difference Between a Snap Cutter and a Wet Saw?
A snap cutter scores the tile surface and then breaks it along that line, which is fast, quiet, and perfect for straight cuts in ceramic tile. A wet saw uses a spinning, water-cooled blade to grind through the tile, handling thick porcelain tile, stone, and detailed cuts. Manual cutters are cheaper and more portable, while a tile saw shines on tough materials and intricate work. Many DIYers own a snap cutter and rent a wet saw only for demanding jobs.
Can I Cut Porcelain Tile With a Manual Tile Cutter?
You can cut thinner porcelain tile with a good manual cutter, but it takes a sharp scoring wheel and a confident, even score. Dense or thick porcelain is much harder than ceramic and tends to crack unpredictably when snapped. For the cleanest results on porcelain, a wet saw is the safer bet. If you only have a manual cutter, practice on offcuts first to get a feel for the pressure.
How Do I Stop Tiles From Cracking or Chipping?
Most cracks come from a weak or uneven score, so focus on one smooth, firm pass with a sharp wheel. Make sure the tile sits square and stable before you score, and snap with even downward pressure rather than twisting. For curves, nibble small bites with tile nippers instead of taking big chunks. A steady hand and patience prevent nearly all chipping.
Is It Safe to Use a Tile Cutter at Home?
Yes, a manual tile cutter is one of the safer power-free tools you can use, as long as you take basic precautions. Wear safety glasses to guard against flying chips and gloves to protect against sharp edges. Keep your fingers clear of the scoring wheel and breaking wings, and work on a stable surface. With a wet saw, add extra care around water and the exposed blade.
How Do I Get Straight, Even Cuts Every Time?
Accuracy starts before you score. Mark a clear cutting line with a square, then line it up precisely with the wheel using the cutter’s guide rails. Push the tile firmly against the fence so it can’t shift, and use a measurement stop for repeat cuts of the same size. Straight cuts are really about setup, not brute force.
Conclusion
You now have everything you need to tackle tiling with confidence. The key takeaway is simple: measure carefully, score once with a sharp wheel, and snap with steady, even pressure. Once you understand how to use tile cutter tools the right way, those crooked edges and cracked corners become a thing of the past.
If you haven’t picked up a cutter yet, check out our recommended picks above to match one to your project. Now grab your tiles and put these steps to work. When you’re ready for more, explore our other tool guides for your next home improvement job.
